Saturday, 1 October 2011

Mustache Mania

When I have playgroup at my house I am always trying to think up a cute craft.
This can get tricky with 8 kids over.
I wanted to incorporate autumn along with something fun.
Then I remembered all the cute mustaches I have been seeing lately
and realized two leafs that looked alike would make a mustache.

Supplies

2 leafs
1 Popsicle stick
1 piece of green paper (fit two leafs)
hot glue gun
glue

Place the leafs on the paper

Glue the leafs in place with the tips touching
keep rubbing down the parts that lift up
After the glue is dry cut out around the leafs
(Adult only part) Hot glue the stick to the back.
Let the silliness begin
They loved their mustaches.  Especially the girls.  The boys did as well but wanted nothing to do with pics.
I hope you have fun making this with your kids.

Friday, 16 September 2011

Turning my hubby's shirt into Mine!!!

My husband cheers for my rival
yes
You heard me, the {shhhh} "Other team"
So, when he was in a golf tourney and won a UTAH t-shirt you can guess how thrilled he was
He got home and tossed it to me and said "I don't want this ugly shirt...here."
I have been wearing the boxy mens shirt as a cleaning shirt for quite some time.
I decided it was high time that I wear it as a cute girl shirt
especially since the BIG Game is tomorrow

GO UTES!

You will need:
Pins
Fabric sissors
Sewing machine
chalk
A woman's cut shirt

A:  Mens boxy shirt
B:  Lay the woman's shirt over the top and line it up in the top center
C:  See how your shirt doesn't even go past the shoulders
D:  Draw your chalk outline around the sleeve line.  I put pins in on the seem of the white shirt so that when I put the sleeve back I could see where to draw the line.
E:  This is what your chalk outline should look like.
F:  Put pins all along the chalk line.  Cut out the shirt.

G:  YOUR SHIRT SHOULD LOOK LIKE THIS

Now for the sleeves.

H:  I used the piece of the sleeve that I cut off 
I:  Chalk around the other part of the sleeve.  Again I pinned the white shirt on the seem to have a line to draw with the chalk.  Make sure you are starting from the top wear the fabric folds.  This way you have one piece when you open it up.
J:  The sleeve should resemble this. 
K:  I cut off the collar and took the front down a bit to make it a more "girlie" shirt. (I of course forgot to take a pic of this step)  See the final pic for the ides. 
The sleeves should look somewhat like this when placed on the shirt.
You can now un-pin the shirt and turn it inside out.

L:  Pin the sleeve to the shirt.  This is tricky  I had to pin it twice because i pinned it so the stitching would show the first time.  Before you sew anything turn it right side out and this will help you determine if it is right.
I sewed the sleeves on first.  Once the sleeves were on I sewed the straight line down the sides. 
It literally took one hours to do.
So easy and so much cuter than before

Not so boxy men's shirt anymore

This was a little rushed so if you have any questions just leave a comment and I will try to answer it to the best of my abilities.

If you make this I would love to see it so send me a blog link or email me.
Enjoy

And one last thing

GO UTES!!!

Monday, 12 September 2011

Charades in Reverse

Looking for a FUN game to play with the family?
If you want to see your family play together and be totally goofy here is your FREE fun night.
Tonight we played Charades in Reverse.
yes, in reverse
don't worry this is easy to understand.

We switched things up tonight by having everyone act out the clue, while only one person guesses.
We simply put a bunch of words in a hat and pulled them out and did three at a time.  Then we would switch to another person to guess.  You could do as many as you could in a set time limit with teams.  Everyone has to act out the word(s) without discussing it.

The words we used:

hopping
silly
totem pole
leap frog
tug-of-war
Hannah Montana (for my daughter)
baseball pitcher
coughing
pudding face (our fav commercial)
running
grumpy
goal
Grinch (for our other daughter)

The list could go on and on.
Make it personable for your family.

The person guessing had to switch out and let someone else guess after they got 3 right.
Or you could play in teams and do a time limit.
Our family liked to do it all together. 
We have young kids that is why our words were easy.
Except no one knew what a totem pole was.  (I may need to do school at home.)

We had a ton of fun.
After we went through our list the kids then acted out the title of their favorite shows. (Normal charades)
Go and try this with your kids.  
It truly was a blast.

Friday, 9 September 2011

SUBWAY ART {HALLOWEEN}

Who doesn't love subway art.

Here is a Halloween one just for you.
Since I don't know how to get you the download just right click on the pic.
If this doesn't work shoot me an email and I will email the jpg to you.

16X20
11X14

Tuesday, 6 September 2011

{Personalized} Wall Art

I love anything that has my kids names on it. Again we all know that I LOVE PBK. A little to much maybe. But I HATE their prices. So when I see something this cute I have to make it. It was $89 on PBK. I paid $8 for the canvas and if we want to get technical I paid a $1 per color for the acrylic paint. But I already had the paint so that doesn't count :)
What I learned was canvas is very forgiving.  If I messed up I could just wipe it off if it wasn't dry.  It was very easy to do and in a little kids room your art work can look like you yourself is a little kid.  :)

Step One:  Dampen the canvas with a wet rung out rag.
Step Two:  Paint your base color.  I loved baby blue as you can see.
You paint this on the entire canvas.
Step Three:  Allow the canvas to dry completely.
Step Four:  Paint your pattern.  Again if it isn't what you want you can wipe it way with a rag.
Step 5:  Anytime you paint over another color allow the base color to dry completely.  
Step Five:  Hang that cute thing up.
I love my sons baseball shirt. I can't throw it out even though he has out grown it.


Hints:  Light colors are more forgiving. 
Draw your picture first on paper.
Be creative.
Think of drawing you did when you were little.  Do something like that.
If you are going for a whimsical look do swirls with your paint brush.  Even use the tip of your wet rag.
Enjoy it.  Your kids will love having something from you on their wall.


Saturday, 3 September 2011

I can almost smell it in the air...

I can't wait to fill this cute calendar up with fun Halloween goodness.
My cute friend and I made these after seeing them on this awesome blog.
It was so much fun to make.
Restless Risa is way to awesome.  
I had to make mine a nine day calendar to keep the cost down.
I used my cricket and sticky felt for the numbers.
The pockets are filled with things we love (and do anyways)

I know the Monday night before Halloween we will go to the pumpkin patch so that was in that day.
I like to make sugar cookies so I put a cookie cutter in that spot.
There were glow sticks on Halloween night.
Pencils and erasers
etc..

Make sure that everything is Halloween themed.  This adds to the fun.
I got ribbon to tie it with.
The bags had Halloween on them.

The kids will love this.

Saturday, 27 August 2011

Only 38...

I have been feeling a little meloncoly now that my kids are back in school. 

I MISS THEM!

So when I read this on my cute cousin's blog it made me smile.
Seriously what a cute mom.
I would have loved to come home to a sign like this.

Maybe next year I will copy.

What do you do to make your kids feel special and know you want them around?

Wednesday, 24 August 2011

With you as my teacher...

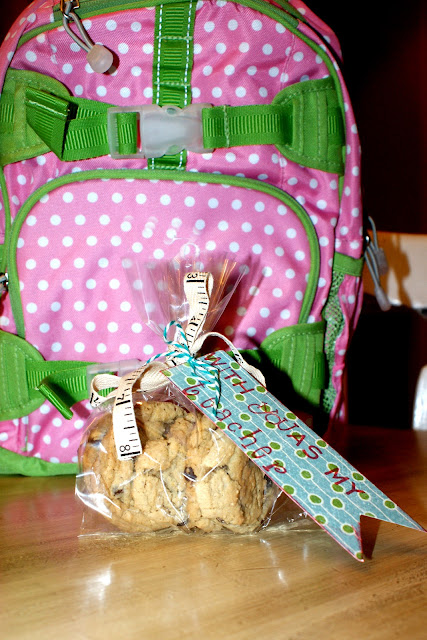
This year I did a teacher gift that was simple.   
I had planned on making cookies but didn't think about a cute tag.
 Finally after some blog searching I found the saying I wanted. 

"With you as my teacher
I am going to be one
Smart Cookie."

I found the saying over at eighteen25
I love that blog.

It helped to make the cookies in advance.  Cookies freeze very nicely and so I froze enough for each teacher and then the day of school I just pulled it out of the freezer and gave them to the kids.
I put the tags on them the day before school.  I just used stamps but the cricket would work great. 

My son's teacher told him on his first test he get an A+, because a cookie is just what she needed.
That made his day.


Saturday, 20 August 2011

Beat the Heat...Slip 'n' Slide Baby

I love slip 'n' slides but they are usually pretty small and pretty expensive. This year I decided to change it up a bit. Painters plastic is really sturdy and so off to Home Depot we went to buy us some. Yikes, it was way more expensive than I thought. I bought black and went home and checked things out on the internet. Apparently black ruins the grass. I looked into things and Lowe's was way cheaper than Home Depot so I headed there for the clear visqueen. We got a 10x25 feet long one. There is bigger but I thought this would work for us.

You can basically put ANYTHING in google and find something.  So again, I put homemade slip 'n' slide on google and this lady turned out to have the easiest instructions.  Just simply pour baby shampoo all over the visqueen and turn on a sprinkler.  I used the bike wash and it worked like a charm.  We set it up and soon enough the neighborhood poured in.  We love having friends over.  It really was a lot of fun and the kids loved it.

Supplies
10x25 feet Clear Visqueen (Painters Plastic) Lowe's was the best price for me
1 bottle of Generic Baby Shampoo
Sprinkler or Bike Wash
Water

This cost me about $10 and it will last for the summer.  Can't beat that.

Friday, 19 August 2011

Caterpillar Craze

My kids were putting a warm fuzzy (pom pom balls) in a jar every time that they did a good deed.  
Just like every other ploy or tactic I use to get them to be nice this 

-FAILED-

I think it had something to do with one sibling asking
"Can I get a warm fuzzy for not hitting my sister today."

Like I said

-FAILED-

Now I had a big ole jar of pom poms.
What to do?

Hahaha, not really

My kids immediately were in heaven. 
They made all sorts of things.
ducks, bunnies, pigs, birds, etc, etc, etc
but my favorite of the bunch had to be the caterpillar.


How cute would it be to make this and give it as a gift with "The Hungry Caterpillar" book.
My 3 year old and her BFF played with these the rest of the time they were here.
Who knew pom poms could be so fun.


Why does my oven look like  fish tank in this pic???


We just used hot glue and I had the girls hand me the color they wanted next.
I put three smaller ones on the ends and googly eyes on the heads.
They were so cute and SIMPLE...
and really, who doesn't love simple. 

Thursday, 4 August 2011

Fabulous Maxi Skirts for the ladybugs

I have a few blogs that I love to visit. When I saw this skirt on Brassy Apple I just knew I had to make it.  We ran out to our local thrift store and bought six stripped shirts at $2 a piece.  Then we made 3 skirts.  It was so easy and my girls LOVE them.  Check out her tutorial she has easy to follow step by step instructions.  LOVED this project.

Wednesday, 13 July 2011

The Bike Wash

If your kids are like mine then you will understand how excited I was to find a project for them to work on and a toy for them to play with in one. 
My sons mind is constantly going.  
He loves to create things, invent things destroy things, etc. etc. etc.

This was the perfect project for him.
He helped me come up with the concept
and even added his own plans to it.

What you need:
2 PVC Pipe 7 feet
4 PVC Pipe 3 feet
2 PVC Pipe 2 feet
1 can of PVC Pipe glue
3 cap end
3 "T" shaped
(for the base and middle that screw in.)
2 Elbows sprinklers
1 hose attachment.
1 sprinkler hose thing (blue piece)
1 flower or full coverage sprinkler head
Hand drill with a small bit

If you have any questions or alterations the Home Depot guys are great to help out.

It was ready to go in about 20 minutes.
The kids loved it.
You can't see it in the pic but we drilled holes in the PVC pipe along the insides and they spray the kids also.
We had a long line of neighbor kids ready to ride their bikes through.  
It got dubbed the "Bike Wash".
It is a ton of fun and super easy to do.
I'd love to see what you come up with so let me know.

Tuesday, 12 July 2011

Harry Potter Craze

When Harry Potter first came out we read books 1-3 all snuggled up in bed.
But my kids were getting older and schedules made things harder.
That is why one summer we decided to start listening on CD.
This way I could make dinner or fold laundry but still be with them.
The kids would get their paperback copies out and read along.


This is one of our favorite memories we have.  We loved listening to Jim Dale read.  He is amazing.  I think hands down the kids loved these moments more than watching the movies.
The narrator just brought these books to life.  Plus, nothing is left out like in the movies.
The best part about it for me was that my kids really got motivated to start reading.
My oldest can't stop.  I literally have to beg him to go out and play.
Thank you JK Rowling and Jim Dale for making my kids love BOOKS!!

I would definately recommend doing this as one of your summer activities.
He also narrated the Peter Pan series.
I think we will go get that for this summer.